Converting Cisco IOS-XE Software from Bundle Mode to Install Mode

Recommended Releases for Cat9k

Today we’re are going to be converting a Cisco WS-C3850-24XS from a Bundle Running Mode to an Install Running Mode.

If you haven’t read my other post on operating modes for the Cat3k or 9Ks, look there first. Upgrading Cisco IOS-XE Software (Install Mode)

You can also review upgrade procedure for specific hardware.
Catalyst 9200 upgrade procedure or review Campus switching positioning with Catalyst 9Ks for a quick reference to determine what hardware is best suited for your campus.

I first want to show you the file(s) that each mode references. I’ll use the show version command to do this.

3850-1
3850-2

You can see from the previous output that the 3850 is running in BUNDLE mode. Secondly, the line that starts with ‘System image file is..” This line is the name and location of the booted Cisco IOS XE bundle file. Notice that this is a .bin extension.

3850-3
3850-4.PNG

Again using the show version command, in the previous output the 3650 is running in INSTALL mode. This time the line that starts with ‘System image file is..” is referencing the name and location of the provisioning file ‘packages.conf‘.

Let’s continue changing our Bundle running mode to Install running mode.

To do this, execute the command below in exec.

3850# software expand running to flash:

3850-5

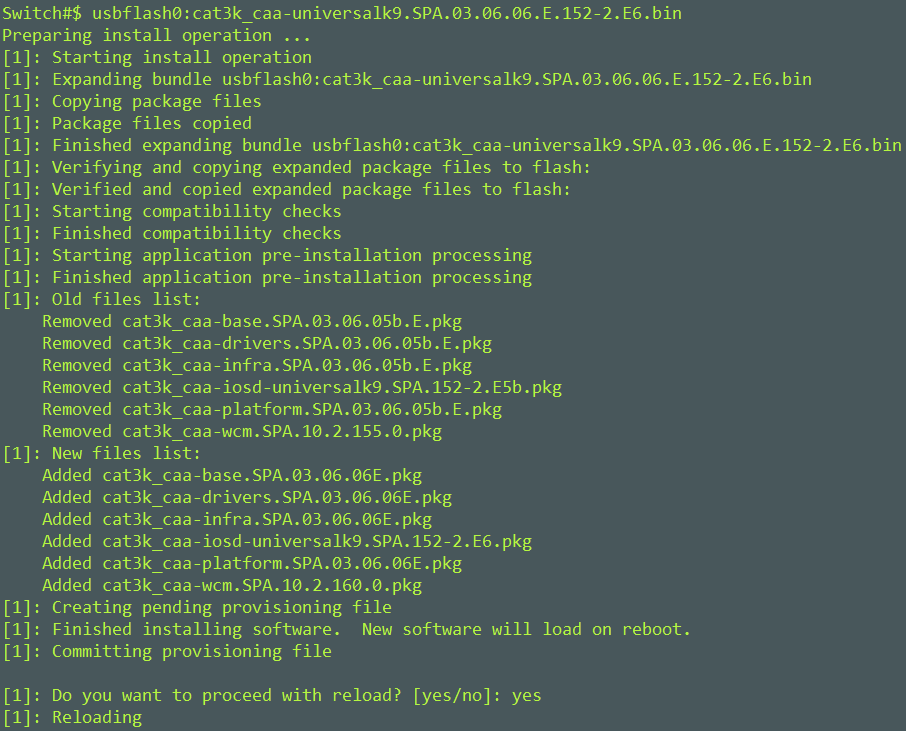
I am executing this on a stack so you can see that the operation is expanding the bundle (.bin) file to switch 1 and switch 2. This is essentially unpacking .pkg files from the running .bin file on the switch.

Notice that the switch attempts to create a packages.conf file but it already exists, so it creates a file called ‘running-packages.conf‘. This isn’t a big deal. If you want your file to be named packages.conf, just rename the original packages.conf to something else before you run the above command.

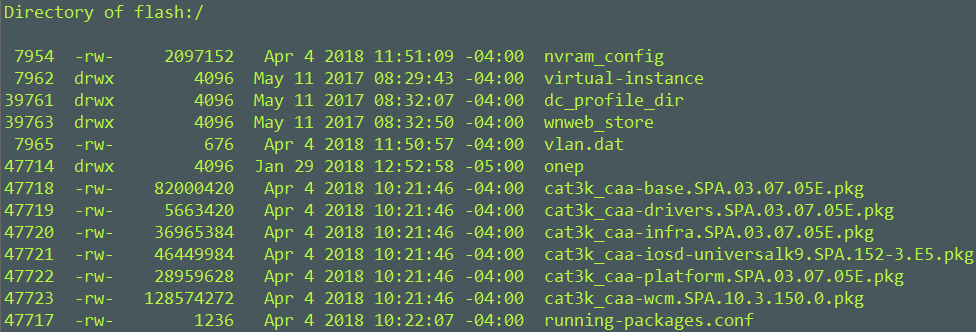
After this finishes, we can view the flash:/ to see our pkg files.

3850-6.PNG

Here we see two .pkg versions, 03.07.04E.pkg and 03.07.05E.pkg. Which one is the most recent one? 03.07.05E.pkg is the most recent because that is the version we extracted from our current running cat3k_caa-universalk9.SPA.03.07.05.E152-3.bin file. Also, notice the running-packages.conf file.

Let’s change the boot system variable to reference our new .conf file.

3850-7

Note: Check to see if you already have a boot variable defined. Change it so that on next boot you load your packages.conf file and not the .bin file. Check the boot var with the command show boot to confirm.

Save your running config to start up and reload the switch.

After the reload, we can check our running mode.

3850-8

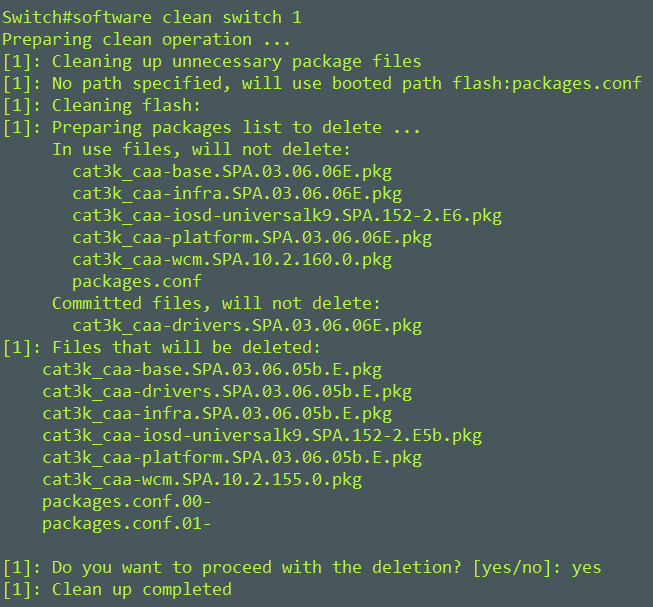
Lets clean up our flash directory.

3850-9

Here is the flash directory after we cleaned it.

3850-10

Mike

CCIE, is it time?

I have always had a dream to one day become CCIE certified and it has always been just that, a dream. It has always been unclear on how I would do this. There is no road map to becoming a CCIE. So when I sit and dream about becoming a CCIE it makes me a bit anxious. My blood pressure starts to rise, my palms get sweaty, my stomach starts to hurt. I can’t help but be anxious.

I started to groom my conscious thoughts about becoming a CCIE for a few months  hoping to set ease by Googling things like, “How to become a CCIE?”, or “What does it take to be a CCIE?” (this really didn’t help). The overwhelming response was, be ready to sacrifice a lot and that it is expensive..great thanks for stating the obvious.

Unfortunately I wouldn’t have a “sponsor” for this journey, which is fine but having an employer assist me in my efforts would be great (This changed July 26th 2018, when I was hired by Cisco). I also didn’t have peers that were of the CCIE status. It wasn’t like I was sitting in a room of other CCIEs that I could ask questions to. So it was hard for me to understand things like, how to start?, where to start?, what are the best resources?

I started to curate a list of resources that I would use for my studies, I even created a work/study schedule that I could use as sort of a soft opening to my studies. I started reading Routing TCP/IP Volume I and II by Jeff Doyle for my soft opening studies as I called it. I would tweak the schedule based on how I felt and after a few months had a good plan in place that compliments work, family, and pleasures.

What did turn out to be useful from my Google searches was that many CCIE achievers started with ensuring that their spouse, family, friends, and others understood the sacrifices and what it would take to achieve their CCIE. Many of them stated that this was key to their success. So for that reason and after a few months I sat to discuss my CCIE aspiration with my wife. My wife already knew about this CCIE dream, so it wasn’t a surprise to her when I brought this up. I was fully transparent about my studies, the cost and the marathon I was about to start. She was fully supporting, and couldn’t have asked for a better support system than her. I then included my friends, family and my employer in my efforts.

As of today April 2, 2018 I will be starting my CCIE journey. I plan to fall in love with the process of becoming great. This journey will be about becoming an expert in my field and as a byproduct achieve my CCIE. I hope to share as much as I can with all of you during this time. I appreciate any and all support.

Mike


BGP Peer Templates

Today we’re diving into BGP peer templates.

Peer templates are an evolution to BGP peer groups and serves to address some of the limitations that BGP peers groups carried.

BGP peer groups were used to reducing the number of configurations on a router with many BGP neighbors. In addition to reducing the routers configuration it also offered performance gains by adding the members of a BGP peer group to an update-group. BGP updates are then performed on the group rather than the individual neighbors.

The limitations to BGP peer groups:

  • All neighbors in a group had to share the same outbound routing policies.
  • All neighbors in a group had to be of the same address family.

The answer to the first limitation came from a feature call ‘BGP Dynamic Update Peer-Groups’

Dynamic update Peer-Groups dynamically assigns neighbors to a BGP update-group that is subject to the same outbound routing policies. This meant that you didn’t need to configure a Peer-Group for performance gains.

To address the second limitation, peer templates were introduced.

Peer Templates as did BGP peers groups were created to simplify the configuration of BGP neighbors but carried more power and less limitations.

There are two types of peer templates:

  • Session templates group and apply configurations statements for the BGP session.
  • Policy templates group policy configurations that can be applied to multiple neighbors.

Here is a basic configuration for both

Configure policy template called ibgp_policy

bgp_tem1

Configure session template called ibgp_session

bgp_tem2

Apply templates to IBGP neighbors

bgp_tem3

Templates support something call inheritance. Inheritance allows one template to inherit characteristics from another template. For instance you could have a high level template that defined BGP keepalives and hold down timers for all of your sessoins.

Here I configure a session template called bgp_top. I then have my ibgp_session inherit bgp_top.

bgp_tem4

There are some limitations around how many inheritance a template can inherit. It’s unlikely that you run into them unless, say you are a large transient ISP.

That’s all for BGP peer templates.

Mike

ISE Posture Troubleshooting

Welcome to the first blog of the new year, sorry for the late start. I’ve been stuck in the trenches trying to figure out the application flow for the posturing module used in the AnyConnect client.

A client of mine is having mixed results when an endpoint authenticates and then attempts to posture to their network. Some of the symptoms that are experienced are as followed:

  • Device and user authenticates, AnyConnect reports incorrect policy server
  • User reports intermittent network interrupts during their working day
  • User receives “Untrusted server blocked!” (certificate issue)

I’ve invested a lot of time absorbing and digesting Cisco’s documentation for Cisco ISE and AnyConnect and believe at this point I have a good understanding of it.

Here is what I found and how you can perform the same troubleshooting steps to help resolve your issues.

We are focusing on Posturing. So after Authentication and Authorization is successful, posturing begins. Posturing is just a way to ensure that your endpoints are complying to your companies network policies before gaining network access.

The AnyConnect Posture Module begins by initiating policy server detection. This is accomplished through a series of probes which are known as discovery probes.

There are three probes in total, and I will show you how they look.

Probe 1 – AnyConnect sends first discovery probe to the clients default gateway. This discovery probe along with the next two are HTTP GET requests to /auth/discovery.

1discovery

This request will be intercepted by the switch that the client is connected to and present a redirect-url to the client. This redirect is that of your policy node. If your AC is unsuccessful it will attempt a second probe.

Reminder: this is all done in the background and is not known to the user

Probe 2 – AC sends second probe. A HTTP GET /auth/discovery to enroll.cisco.com. This FQDN needs to be successfully resolvable by DNS server. In VPN scenario with split-tunnel, traffic to enroll.cisco.com has to be routed through the tunnel.

2enroll

3cisco

Expected result for the probe is redirect-url to your policy nodes.

Probe 3 – HTTP GET /auth/discovery to discovery host. Discovery host value is returned from ISE during installation in AC posture profile. Expected result for the probe is redirect-url

Your AC posture profile lives here.

C:\ProgramData\Cisco\Cisco AnyConnect Secure Mobility Client\ISE Posture\ISEPosture.xml

Unfortunately none of these probes were successful for my client.

Posture would sometime succeed but not always. When it was successful the client was pointing to an old policy server in their old ISE 1.3 environment yet their clients were Authenticating to their new ISE 2.2 environment.  hmm..

That turned out to be a key part in resolving their issue. My client had recently migrated from ISE 1.3 to ISE 2.2. ISE 2.2 changes the way posturing works.

Posturing in ISE 2.2 assumes that redirects are not needed but does support backwards compatibility for environment that use redirects.


I won’t be going into detail on how posture work in ISE 2.2. But do know that there are two stages.

Stage 1 uses the same traditional discovery probes that we listed above for backwards compatibility.

Stage 2 uses two discovery probes.

Probe 1 – Attempts to discover your PSN through IP/FQDN from the “CallHome list” that are defined in your posture profile located in

C:\ProgramData\Cisco\CiscoAnyConnect Secure Mobility Client\ISE Posture\ISEPostureCFG.xml

Probe 2 – AC tries the PSN FQDNs. It generates what should be a dynamically created file (ConnectionData.xml) upon first posture attempt. That file is located here.

C:\Users\<currentuser>\AppData\Local\Cisco\Cisco AnyConnect Secure Mobility Client\

The goal of both probes is to get FQDN. They are both there in the case where you don’t have your “CallHome List” defined for the first probe to succeed.

So after knowing this. I reference ConnectionData.xml. The .xml file had current ISE 2.3 and Old ISE 1.0 FQDNs.

I could delete and modify this file to exclude old ISE 1.0 FQDNs but it would reappear upon the next posture. I continued my troubleshooting.

I deleted ConnectionData.xml. I uninstalled the posture module from the client. I had the client re-posture so that I would receive the installation of the posture module.

I then referenced my newly dynamically generated ConnectionData.xml and bam! The .xml file only had ISE 2.3 FQDNs. It had no knowledge of old ise. Come to find out, the customer had a off line deployment package that included the ConnectionData.xml file and placed it in C:\Users\<currentuser>\AppData\Local\Cisco\Cisco AnyConnect Secure Mobility Client\…..When AnyConnect is deployed off-line and  includes the .xml file, it creates a static entry in the file even though that file is rebuilt at each posture.

After fixing the discovery probes which was to enable http server on the default gateway where the hosts live and correcting the .xml file to exclude old ISE FQDNs. Clients were posturing to new ISE.

It’s been a long journey in this discovery but things are looking up.


Mike


Upgrading Cisco IOS-XE Software (Install Mode)

Recommended Releases for Cat9k

I got my hands on a Cisco Catalyst 3650-48PD-L switch which is the first access level switch that I’ve dealt with that is running IOS-XE. IOS-XE isn’t new, I prefer it over IOS because of its Linux base and the processing advantages it has. So today we will be going through the software upgrade process for a 3650 running in install mode.

You can view my other post on how to convert IOS XE from Bundled running mode to Install running mode.

Converting Cisco IOS-XE Software from Bundle Mode to Install Mode

You can also review upgrade procedure for specific hardware.
Catalyst 9200 upgrade procedure

As a quick introduction, here are some differences between IOS and IOS-XE.

IOS

  • Monolithic – The OS and its processes run in the same address space on the same hardware.
  • A single process could crash the entire system

IOS-XE

  • Runs a Linux OS
  • Modular System
  • Multiprocessing allows for workloads to be shared across multiple CPUs.
  • Individual sub packages create IOS-XE that can be upgraded individually

Now that you have some understanding of the differences between IOS and IOS-XE you need to understand that there is two modes of operation.

The Cisco Catalyst 3650, 3850, and 9K series switches have two modes of operation, Install Mode and Bundle Mode.

Install Mode

Install mode uses a package-provisioning file named packages.conf, which is in charge of booting the switch. There are several .pkg files found in the flash drive that provide a specific function to the OS. Cisco recommends not altering any of the files.

Bundle Mode

Bundle mode uses monolithic Cisco IOS images to boot the switch. It consumes more memory than Install mode because packages are extracted from the bundle and copied to RAM.

I would suggest operating in Install mode as this is the default, and provides you with a modular system, you can switch them if you choose.

Lets continue into our upgrade..

You can see from the output of the 3650 that the current software version is 03.06.05b.e and it is running in Install Mode.

sw.ver

Download your image from Cisco. The new software version here will be 03.06.06E. I have chosen to use a USB drive to place my source image on, but you can still use a transfer protocol like TFTP or SCP.

sw.usb

After confirming that you have your source image in its proper location, execute the following command on the switch with your source image accurately defined.

Switch#software install file usbflash0:cat3k_caa-universalk9.SPA.03.06.06.E.152-2.E6.bin

The switch prepares the image for installation; below you see the switch performing pre-installation tasks. It will ask you to confirm a reload. Confirm a reload by typing Yes.

sw.upgrade

It will take several minutes to reload, during the reload processes the switch does several post-installation tasks such as updating the Front-end Microcode.

sw.reload

Once the switch has successfully finished reloading, you can log back in and confirm that the new version was successfully applied. Below we have successfully loaded 03.06.06E onto the switch.

sw.3.0.6

As a post clean up task you should execute the command software clean switch 1. This will remove the packages.conf and .pkg files associated to the old image.

Switch#software clean switch 1

sw.post

Here is what the flash looks like post upgrade..

sw.flash

That wraps up the upgrade process. I hope that this has been helpful for you.

Mike

https://www.cisco.com/c/en/us/td/docs/switches/lan/Denali_16-1/ConfigExamples_Technotes/Config_Examples/Misc/qos/m_install_vs_bundle.html#task_991364C7181E4282B54C9950B2C13B29

CCNA 210-255 SECOPS

I recently concluded my Cisco CyberOps Scholarship program on October 20, 2017. With the conclusion came the second (210-255) of the two test to achieve your CCNA CyberOps certification.

I am sitting to write this post after several weeks of having already sat for the exam. I want to cut to the chase and report that I failed. Not once, but twice. Yes twice. I went into the the test having taken the same steps for studying for all my tests.

  1. Familiarize myself with the material
  2. Note taking
  3. Labs
  4. Walk the blue print

Walking the blue print is probably the most important part, I know that if I can answer the material found on the blue print I would be able to answer the questions on the test. It was no different in this case. I was familiar, overly familiar. and.. I failed my first attempt. After posting a fail I immediately scheduled for a second attempt.

My second attempt was ten days away. I was still a bit down on myself from posting a fail but I went to take my test with assurance that I would pass my second attempt. Question 60, the last question of the test. I’m feeling good at this point, I used reasoning from my first failed attempt to justify my answers on the second attempt, I click finish… My heart sank. On the results screen read..

“We have regret to inform you…”

I was beside my self. I was upset and didn’t understand what had just happened. I called my fiance to tell her the results. She replied with comforting words, she assured me that I was still a great engineer despite failing the test. I felt embarrassed. An NP level engineer can’t pass an NA level test? I was broken for a day after posting my second fail.

I sat to compare my results from the two attempts. I posted a 792 on both attempts. Missing the mark of 820 by one or two questions. When comparing question categories, my results from my first attempt to my second showed that I had  increased in some areas and decreased in others. Based on these results, I realized that my failure wasn’t a fact of not understanding the technical material but perhaps it was the state of mind I was in when I had taken the tests.

It would have been nice to walk out the scholarship program with a new certification, but what really matters is that I have a much better understanding of security. This understanding will help with my daily operation as well as my career development. I will continue to learn as much as I can in all realms of IT. For now, I will wait before deciding to attempt the test again. For those of you studying for your certifications; keep going, work hard.

Mike