Cabinet and Rack Requirements for Cisco Nexus 7010

You can install a Nexus 7010 switch in any cabinet as long as it meets these standard requirements

  • Standard perforated cabinets
  • Standard open racks
  • Solid walled cabinet (needs roof fan tray)
  • 19-inch Four-post rack with universal hole spacing

Height

  • Must be at least 21 RU for one chassis
  • 42 RU for two chassis ( recommended is 45 RU)

Depth

  • 24 to 32 inches between front and rear mounting brackets

Clearances between Nexus 7010 chassis and edge of rack or interior of cabinet

  • 7 inches between the chassis (front/back) or interior cabinet for cabling


Additional site requirements for the rack

  • AC Power receptacles must be with 12 feet of each power supply in each chassis
  • Provide cable management for up to 384 ports for each chassis
  • Cable management should support for up to 384 ports per chassis.
  • Cable routing should not block access to any of the modules
  • Cable routing should not block any airflow or exhaust vents

CCNA 210-250 SECFND

The first section of my Cisco cyber security scholarship program started in late June. I have been investing much of my time into the material to glean as much as I can from this course. Overall, I am impressed with the course material. They have provide webinars, mentors, course readings, end of section quizzes and hands on labs for each section.

Content Based Training has come a long way and Cisco has nailed the hands on offering of this course. Each section has a lab associated to it. Each lab is discovery based, meaning there isn’t an end goal or objective you need to meet. It is simply up to you, on how far you want to take the lab. There is of course directions for the lab to assist your learning. Each lab has multiple virtual machines, examples, and topological representation of how the virtual machines are connected and communicating.

After completing the first section in mid to late July, I started to study for the 210-250 SECFND exam. I sat for the test 8/7/17 and passed.

It’s clear that the test is still in the design and development phase. Nonetheless the test is completely passable with the course content that Cisco is providing to the scholarships students. Although walking the blueprint did provide some structure for passing and is worth doing, I found myself somewhat neutral on the relevance of the blueprint and the questions that were asked on the test.

For those of you in the scholarship program, or for those that will be in the scholarship program in the future. Use your time wisely, stay focused, and most importantly, don’t be afraid to fail.

Thank you Cisco.

Mike

Nexus 5548 Port-Channel Design

Introduction

This configuration example describes how to establish a Port-Channel on a Cisco Nexus 5548 switch with a FEX and a host server.

Port-Channels allows multiple physical links to combine into one logical channel, which allows the links in the channel to share traffic load, as well as redundancy in the event that one or more links in the channel fail.

Prerequisites
Requirements

Ensure that you meet these requirements before you attempt this configuration:

  • Server supports Dual NICs capable of running LACP (802.3ad)

Server hosts with NICs that are inoperable with LACP (802.3ad), consideration needs to be taken to make the next best teaming configuration such as Active/Passive.  If the host is not dual NIC capable use a stand alone switch such as a 4948 that has LACP to the 5548.

Related Products

This configuration example can also be used with other Cisco Nexus family switches that run Cisco NX-OS software, slight differences exist between hardware platforms i.e 9Ks, 5Ks, 2Ks.

Note: This document uses the NIC adapter which supports LACP and FEX uplink configurations.

Configure
Network Diagram

This document uses this network setup:

Note: Nexus environment is setup in a vPC domain.

vpc-port-channel

Switch Configuration
In order to configure the switch, complete these steps. The following configuration needs to be done on both Nexus devices found in the same vPC domain.

Configure a Port-Channel

IMPORTANT: Port channel assignments take on the number of the first FEX or member port in the vPC domain.

Example:

Ports 101/1/1, 102/1/1 = po101
Ports 105/1/26, 106/1/26 = po526

Nexus1(config)int po101
Nexus1(config-if)description WEBSERVER 10.123.13.123
Nexus1(config-if)switchport
Nexus1(config-if) switchport mode access
Nexus1(config-if)switchport access vlan 100
Nexus1(config-if)vpc 101
Nexus1(config-if)no shut
Nexus1(config-if)exit

Per the Network Diagram, choose the ports to be grouped:
(Nexus 1) Eth 101/1/1
(Nexus 2) Eth 102/1/1

For each of the listed ports, complete these steps:
Nexus1#conf t
Nexus1(config)#int Eth101/1/1
Nexus1(config-if)#description WEBSERVER 10.123.13.123
Nexus1(config-if)#switchport
Nexus1(config-if)#switchport mode access
Nexus1(config-if)#switchport access vlan 100
Nexus1(config-if)#spanning-tree port type edge
Nexus1(config-if)#vpc orphan-port suspend
Nexus1(config-if)#channel-group 101 mode active
Nexus1(config-if)#no shut

Nexus2#conf t
Nexus2(config)#int Eth102/1/1
Nexus2(config-if)#description WEBSERVER 10.123.13.123
Nexus2(config-if)#switchport
Nexus2(config-if)#switchport mode access
Nexus2(config-if)#switchport access vlan 100
Nexus2(config-if)#spanning-tree port type edge
Nexus2(config-if)#vpc orphan-port suspend
Nexus2config-if)#channel-group 101 mode active
Nexus2(config-if)#no shut

That’s all there really is to it.  Your port-channel numbering scheme can be what ever you would like, I have adopted the style outline above for my numbering and seems to be intuitive and fitting for most.

Here are some helpful show commands.

Helpful show commands

Nexus1#show run int po101 membership
Nexus1#show vpc 101
Nexus1#show port-channel summary


Mike

Setting Expectations

It’s important to set expectations. Everyone has some experience with setting expectations right? Or maybe someone has set expectations for you.

Setting expectations is important and often forgotten about. Expectations help set the foundation for the future. They need to be realistic and achievable. Written down and not spoken.

I take setting expectation in my work very seriously as it could be the difference between success and failure. I like to set expectations so that the enterprise or customer is aware of my intentions, problems or successes. Most importantly, it helps shape their expectations. There are some steps that I like to take before setting expectations however.

For instance, all of my projects start with defining the problem. Define the problem that your customer or enterprise has come to you for resolution for.

After defining a problem, get..

1.) The user requirement

2.) The business requirements

3.) Set expectations

This approach has helped me greatly. I’m sure many of you have your own way of going about the same thing. If your way doesn’t have setting expectations in it, I urge you to try adding it as part of your procedure and see how things work out.

I wanted to share a before and after picture of a build I had worked on for the better part of a year. I faced many hurdles during this project but had always set expectations for my customer. It led to great success in the end.

Here is one of their MDFs.

before and after


Mike

Nexus – Performing ISSU

What is an ISSU?

Cisco NX-OS software supports in-service software upgrades (ISSUs) on devices with dual supervisor modules.  An ISSU can update the software images on your device without disrupting data traffic. Only control traffic is disrupted.

An ISSU updates the following images:

  • Kickstart image
  • System image
  • Supervisor module BIOS
  • Data module image
  • Data module BIOS
  • Connectivity management processor (CMP) image
  • CMP BIOS

ISSU Process is outlined below

issu

VDC Support

When you upgrade the Cisco NX-OS software, you upgrade the software for all virtual device contexts (VDCs) on the physical device. You cannot upgrade the Cisco NX-OS software for an individual VDC.

Parallel Upgrade

Starting with Cisco NX-OS Release 5.2(1), multiple linecards can be simultaneously upgraded, and the infrastructure support is available. This decreases the ISSU time when compared with an ISSU upgrade that is done serially (one card at a time).

To start a parallel upgrade, use the following command: install all kickstart image system image parallel

Up to three linecards can be upgraded in parallel with this command.


Prerequisites for Upgrading the Cisco NX-OS Software

Use the show configuration session summary command to verify that you have no active configuration sessions.

Cisco NX-OS Software Upgrade Guidelines


Scheduling

Schedule the upgrade when your network is stable and steady. Ensure that everyone who has access to the device or the network is not configuring the device or the network during this time. You cannot configure a device during an upgrade.

Space

Verify that sufficient space is available in the location where you are copying the images. This location includes the active and standby supervisor module bootflash: (internal to the device). Internal bootflash: has approximately 250 MB of free space available.

Hardware

Avoid power interruption during any install procedure, which can corrupt the software image.

Connectivity to remote servers

Configure the IPv4 address or IPv6 address for the 10/100/1000 BASE-T Ethernet port connection (interface mgmt0).

Ensure that the device has a route to the remote server. The device and the remote server must be in the same subnetwork if you do not have a router to route traffic between subnets.

Software images

Ensure that the specified system and kickstart images are compatible with each other.

If the kickstart image is not specified, the device uses the current running kickstart image.

If you specify a different system image, ensure that it is compatible with the running kickstart image.

Retrieve the images in one of two ways:

Locally

Images are locally available on the switch.

Remotely

Images are in a remote location and you specify the destination using the remote server parameters and the filename to be used locally.

ISSU Failure Conditions

The following situations cause the installation to fail to complete:

  • If the standby supervisor module bootflash: file system does not have sufficient space to accept the updated image.
  • If the specified system and kickstart images are not compatible.
  • If the network or device is configured while the upgrade is in progress.
  • If a Spanning Tree Protocol (STP) topology change occurs while the upgrade is in progress.
  • If the install all command is entered on the standby supervisor module.
  • If the install all command does not reference the default bootflash: in a dual supervisor module configuration.
  • If a module is removed while the upgrade is in progress.
  • If the device has any power disruption while the upgrade is in progress.
  • If the entire path for the remote server location is not specified accurately.
  • If some FEX ports are operating in LACP fast rate mode.
  • If images are incompatible after an upgrade. For example, an I/O module image may be incompatible with the system image, or a kickstart image may be incompatible with a system image. This is also identified by theshow install all impact command in the compatibility check section of the output (under the Bootable column).
  • If a linecard is in failure state, the ISSU will abort.


Upgrading a Device with Dual Supervisor Modules

The install all command supports in-service software upgrades (ISSUs) on devices that have dual supervisor modules and performs the following actions:

  • Determines whether the upgrade will be disruptive and asks if you want to continue.
  • Ensure that you have enough space in the standby bootflash.
  • Copies the kickstart and system images to the standby supervisor module.
  • Sets the KICKSTART and SYSTEM boot variables.
  • Reloads the standby supervisor module with the new Cisco NX-OS software.
  • Reloads the active supervisor module with the new Cisco NX-OS software, which causes a switchover to the newly upgraded standby supervisor module.
  • Upgrades the line cards.
  • The Connectivity Management Processor (CMP) on both supervisors will get upgraded.


Upgrade Procedure Summary

Upgrade Procedure Summary

Step 1 Back up configurations

Step 2 Log in to the console port on both of the active and standby supervisor modules.

Step 3 Log in to Cisco.com and download the latest Cisco NX-OS kickstart and system images to a server.

Step 4 Download the Cisco NX-OS kickstart and system images from the server to your device using the copy command.

Step 5 Save the device configuration using the copy running-config startup-config vdc-all command.

Step 6 Enter the install all command at the active supervisor command prompt to upgrade the Cisco NX-OS software on your device.

Note      A supervisor module switchover occurs during the software installation.

switch# install all kickstart n7000-s1-kickstart.7.2.0.D1.1.bin system n7000-s1-dk9.7.2.0.D1.1.bin

The above procedures and information was provided my Cisco’s technical documents found on their web site. It’s mostly prep work before performing an ISSU, and quit easy to execute. Good luck.

Mike


21 Step Program: Nexus 7K Supervisor2/2e upgrade

Nexus: Replacing Supervisor 1 Modules with Supervisor 2 or Supervisor 2E Modules

  • This migration process is disruptive for switches with one or two supervisor modules because the power must be turned off for the switch.
  • Backward migration procedure (migrating from Supervisor 2 or Supervisor 2E modules to Supervisor 1 modules) is not provided.
  • Recommend that you use Cisco NX-OS Release 5.2 (or later release) on the Supervisor 1 module while performing the migration.
  • You cannot mix Supervisor 2 and Supervisor 2E modules in a production environment (this mix of modules is supported only while you are migrating from using Supervisor 2 modules to Supervisor 2E modules.
  • If you plan to enable the admin VDC feature on the Supervisor 2 or Supervisor 2E modules, be sure to complete the entire migration procedure before enabling this feature (see the Cisco Nexus 7000 Series NX-OS Virtual Device Context Configuration Guide).
  • The default-gateway command needs to be removed and replaced with ip route under the cmp-mgmt interface when SUP1 is upgraded to SUP-2/SUP-2E.
  • If you are migrating Supervisor 1 Modules with Supervisor 2 or Supervisor 2E Modules, then replace ip default-gateway x.x.x.x’ with ip route 0/0 x.x.x.x in the config.


Step 1: Insert a USB drive in the top USB port (usb1) in the active supervisor 1 module. If the Supervisor 2 or Supervisor 2E module shipped with an extra USB drive, you can insert that USB drive in the usb1 drive on the Supervisor 1 module.

Step 2: Format the drive by using the format command.

switch(config)# format usb1:

Step 3:
Copy all of the VDC configurations for the switch to the USB drive by using the copy running-config command. I recommend stepping into each vdc and performing your backup.

switch(config)# copy running-config usb1:configuration_file_name vdc-all

Step 4: Backup the installed licenses for the switch to the USB drive by using the copy licenses command.

switch(config)# copy licenses usb1:licenses_archive_file_name.tar

Step 5: Determine the Cisco NX-OS software release to use on the Supervisor 2 or Supervisor 2E modules.

Step 6: Copy the Supervisor 2 or Supervisor 2E version of the kickstart, system, and EPLD (optional) images to the USB drive.

Note: Use -s2- images with Supervisor 2 or Supervisor 2E modules. If you use an -s1- image with a Supervisor 2 or Supervisor 2E module, the supervisor will not boot up.

Step 7: Turn off the power to the switch by turning the power switch on each power supply from ON to STBY (Standby). The Output LED turns off on each power supply and the Status LEDs turn off on all of the supervisor and I/O modules.

Step 8: For each Supervisor 1 module installed in the switch, remove the module and replace it with a Supervisor 2 or Supervisor 2E module.

Note: Be sure the two supervisors are the same type. Do not mix Supervisor 1 with Supervisor 2 modules. Both Supervisors need to have the same amount of DRAM.

Step 9: Power up the switch by turning the power switch on each of its power supplies from STBY (standby) to ON. The Output LED on each power supply turns on and eventually turns green when the power supply is sending power to the switch. The Status LED on each installed supervisor module also turns on when the module begins to turn on. The supervisor that becomes active has a green ACTIVE LED (the standby supervisor module has an amber ACTIVE LED).

Step 10: Remove the USB drive from the Supervisor 1 module (this drive has copies of the Supervisor 1 configuration, license, and software images) and insert it in the Slot0: USB port on the active Supervisor 2 or Supervisor 2E module (ACTIVE LED is green).

Step 11: Connect a console to the active supervisor module.

Step 12: If you are setting up the initial configuration for the supervisor module, the initial setup script will ask you if you want to enforce the secure password standard. Make your selection, enter your password, and then confirm the password by entering it again.

—- System Admin Account Setup —-
Do you want to enforce secure password standard (yes/no) [y]:
Enter the password for “admin”:

Step 13: When you are asked to enable admin VDCs, enter no

Do you want to enable admin vdc (yes/no) [no]:no

Step 14: When you are asked to enter the basic configuration, enter no

Step 15: When asked to log in, enter the login and password that you specified in step 12.

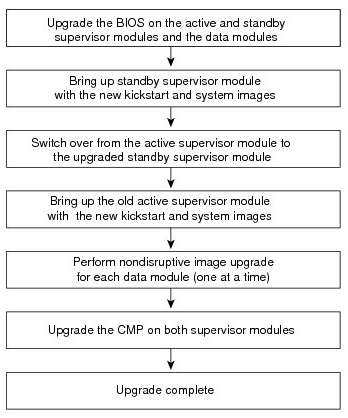
Step 16: Perform an upgrade to the appropriate nx-os version.

  • Change the boot variable.
  • Enter the copy running-config startup-config vdc-all command
  • Enter the reload command to reload the switch.


boot kickstart bootflash:/n7000-s2-<kickstart image>.bin sup-1
boot system bootflash:/n7000-s2-<system image>.bin sup-1
boot kickstart bootflash:/n7000-s2-<kickstart image>.bin sup-2
boot system bootflash:/n7000-s2-<system image>.bin sup-2


Step 17: Copy the TAR archive containing the license files from the USB SLOT 0 drive to bootflash:, extract the archive, and install the licenses by using the copytar extract, and install license commands.

switch(config)# copy slot0:licenses_archive_file_name.tar bootflash:
switch(config)# tar extract bootflash:licenses_archive_file_name.tar to bootflash:
switch(config)# install license bootflash:license_file_name.lic

Step 18: Make sure that all I/O modules are online and that the standby supervisor is in ha-standby mode by using the show module command.

Step 19: If needed upgrade the EPLDs.

Note: To list the EPLDs running on your switch, use the show version module module_number epld command. If any of the versions that you list are older than what is recommended by Cisco, you should update the EPLDs.

Step 20: Restore the previously saved configurations by using the copy command to copy the configuration file in the USB drive to the running configuration.

Step 21: Save the configuration in the startup configuration by using the copy running-config startup-config vdc-all command.

switch(config)# copy running-config startup-config vdc-all